
Every time you pop the hood of a 2017-2019 Ford 6.7-liter Power Stroke, you always find a maze of plastic piping that suffocates potential airflow. Pusher Intakes set out to clear that congestion with a complete overhaul, swapping the stock restrictions for mandrel-bent tubing and a high-flow manifold. This installation focuses on their Full Race / Off-Road Pusher Intake System, finished in a signature Titanium powder coat.
Clearing The Valley
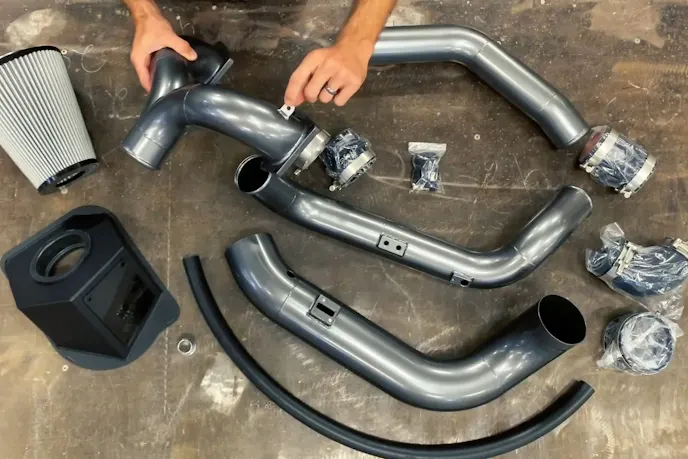
The process begins by removing the factory cold-air intake and the hot-side charge tube to expose the restrictive stock manifold. Removing the lower manifold requires sliding it out from beneath the upper section, a tight maneuver that demands patience. Once the valley sits empty, attention turns to the bench to prep the new components. This involves transferring the Mass Air Flow (MAF), filter minder, and Manifold Absolute Pressure (MAP) sensors to their new homes. Jacob Allenbaugh pointed out that the asymmetric bolt pattern on the MAF sensor ensures you cannot put the Mass Air Flow sensor in incorrectly.


Bolting Down The Pusher Intake System
The heart of the upgrade is the intake manifold, as Allenbaugh puts it: “It’s probably my favorite piece of the whole setup.” He explained that it does an amazing job at splitting the air perfectly between each cylinder bank. Installation starts here to maximize access to the rear flange bolts. The design uses O-rings instead of gaskets, which means owners can take the manifold on and off multiple times without worrying about gasket failures. With the manifold torqued down and the CCV reroute hose tucked away, the rest of the Pusher Intake System begins to take shape.


Connecting the Charge Tubes
Connecting the turbo to the engine requires heavy-duty silicone couplers designed to handle massive pressure. The hot-side tube snaps onto the turbo outlet using the factory C-clip, while the cold-side tube routes from the intercooler to the new manifold. Lubrication is key here to get the boots seated properly. Allenbaugh mentioned that silicone spray helps with the O-rings and couplers. The kit includes provisions for auxiliary ports on the cold-side, though the team capped them off for this specific build to keep the boost contained.

Final Checks And First Start
The build wraps up by installing the tinted Plexiglas window on the airbox lid and double-checking every connection. Allenbaugh admitted he likes to go over his clamps 10 times just to be sure. This system replaces the fragile plastic factory parts with robust aluminum and silicone, ensuring the truck breathes freely. The result is a setup that cleans up the engine bay and results in a way happier, healthier truck.

You might also like
Tips For Stopping The Deadly CP4 Pump Failure On Your 6.7-liter Power Stroke Diesel Truck
Proper maintenance helps prevent diesel engine failure. And consistent fuel additive use helps keep the CP4 pump running smoothly.

