When it comes to gauges, there are TONS of choices out there. You can choose from an extremely wide array of styles and designs, as well as different types of gauges. So, when it comes to putting gauges in your truck, really look at what is available and what you need before pulling the trigger on the cheapest package deal you see. When it came time to install some on our 6.0L Power Stroke, we turned to Auto Meter.
“The biggest first step is taking a look at the different offerings, as far as the meter style between the short sweep electric, digital stepper motor or the mechanical gauges,” says Kevin Dykyj, Technical Sales and Support for Auto Meter. “We offer a few different types depending on needs, like the full sweep digital stepper motor for transmission temperature as well as the short sweep electric that uses an air core meter. The digital stepper motor will self-calibrate every time is it powered on and it has a harness that is included with it. So, not only is it more accurate, but it, also, gives you a more complete installation since it has a harness that plugs in at both ends.”
While these two gauges appear to be the same. The one on the left (#6170) is a digital stepper motor and the one on the right (#6105) is a mechanical gauge.
In addition to the different types of gauges, there are a wide range of monitoring possibilities. One issue with buying a standard package is that the gauges in that package are not selected specifically for your application. If you are going to put a limited amount of gauges (typically 2 to 4) in your truck, they should allow you to monitor the most important aspects of your truck.
Even gauges within a single manufacturer can come in a wide range of styles. All 4 of these are from Auto Meter and this isn't even close to all of their styles. Not to mention, they have a custom shop that allows you to fully customize gauges to your individual liking.
Gauge Considerations for our Application
Not all trucks, whether by make or year have the same types of issues or concerns that need to be monitored. Since we are installing a set of Auto Meter gauges on a Ford Super Duty, let’s focus on those issues key to the Super Duty. The automatic behind the 7.3L Power Stroke was a 4R100. This is a suitable transmission, but keeping an eye on transmission fluid temperature is pretty important. On the other hand, the 5R110 behind 6.0 and 6.4L Power Strokes don’t have the same issues.
Ford addressed the cooling issues and the 5R110 has a much more robust cooling system. So, if you are going to add only a few gauges, you would be better served by selecting a fuel pressure of High Pressure Oil Pump (HPOP) gauge. These can help you diagnose potential issues and give you much better insight into the health of the engine than monitoring something that may never show an issue.
Our Gauge Selection
Here are the choices we opted to install in our 6.0 Power Stroke.
Gauge 1 (#8496): HPOP gauge. In the 6.0L Power Stroke, the injectors fire using high pressure oil. When diagnosing rough running conditions, it is very handy to know what the pressures are. In addition, from a performance standpoint, it is good to know if you are getting everything out of your pump. We have found numerous times on a dyno that a truck wasn’t up to snuff, because of a weak HPOP.
Gauge 2 (#8444): EGT or Exhaust Gas Temperature gauge. This is a gauge that is included in most package deals and is very important. This will let you know how hard you are pushing your engine and whether you need to back off or not.
Gauge 3 (#8463): Fuel pressure gauge. The 6.0 uses a single fuel pump to supply the fuel to the injectors. While this pump usually doesn’t go out, over time the pressure will start to drop down below tolerance. With modified trucks, a common issues is fuel pressure dropping at wide open throttle. Anytime there is less fuel pressure than recommended, there is a risk of engine damage through a lean condition.
Gauge 4 (#8405): Boost pressure gauge. This again is a very common gauge. It is a good indication what is going on, but it only tells you a limited amount of information. If you aren’t able to get to full pressure, there may be an issue, but without additional gauges, there is no way to know what is happening. So pressure gauge like this is less of a diagnostic tool and more of an indicator of the health of the turbo system.
Auto Meter recognizes the need to monitor important aspects of an engine and produce an HPOP gauge (they, also, make a fuel rail pressure gauge for common rail engines). In addition to understanding what gauges are important they offer factory matching gauges for our truck. “We saw the demand for factory matching gauges from our customers who wanted the factory type look but wanted the precision of aftermarket gauges,” mentioned Dykyj.
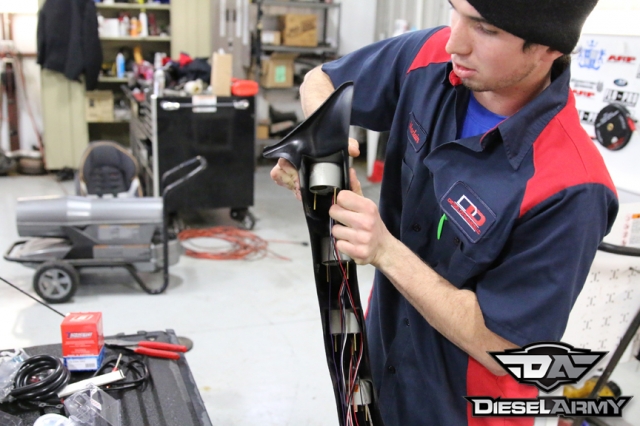
With the gauges in hand, we headed over to Diesel Dynamics to get them installed. MacLain Young is their gauge guru. “I always start by building a wiring harness before I install the pillar in the truck,” says Young.
Young laid all of the gauges and parts out on the tailgate, making sure that they stayed separated. Then he slid the gauges in the Auto Meter four pod gauge pillar. Making sure there was enough room to slide the gauges in and out, he zip tied all of the wires together to make a wiring harness.
With the wiring harness started, Young separated the sensor wires from the power and ground wires. He then zip tied the separate sets together.
Young then cut the wires about a foot past the gauge pod, stripped their wires and connected them to a single larger gauge wire (1 for each color). To complete the gauge pod, Young connected the plastic tube for the boost and added a power and ground wire to the boost gauge.
Next, Young moved to the truck where he removed a side panel on the dash and fed the wires and tubing down into. The final step to installing the gauge pod is to drill a hole through the gauge pod and the factory A-Pillar. Then install the push locks. “I always use one size smaller drill bit than recommended to get a little better hold. Worst case if it doesn’t fit, I can drill it out,” said Young.
With the gauge pod mounted, Young routed the wires behind the dash and out of sight. He was very careful to go slow and not kink the boost tube or tangle the wires. With the boost tube behind the dash, Young used an air nozzle and pressurized the line. He wanted to make sure there were no leaks or kinks in it.
For “Key On Power”, Young probed the wires on the steering column.
With power found, he used a T-Tap to splice into the wire. (To gain access, he unbolted the fuse panel and moved it out of the way.)
For ground, Young used one of the bolts holding the fuse panel in place.
To power the lights, Young went straight to the light switch. He used a T-Tap to supply the power to the gauges. He did warn us that he had seen issues with doing this on a Dodge and GM. “On those vehicles, I tap into the wire after the computer and relays,” instructed Young.
A simple key on ensured that the gauges had power and with the light switch on, they light up. Inside the vehicle is done.
All of the wiring was run through the firewall by cutting a small notch into the cover that covers the factory hole where the clutch cylinder would have been mounted. The wiring was then routed along the cowl.
Young removed the intercooler tube to gain access to the ICP (Injection Control Pressure) sensor. For ’04 and newer 6.0’s the ICP is located on the front of the passenger’s side valve cover. For the ’03 model engines, the ICP is located under the turbo in the HPOP cover. It takes a lot longer to gain access to the ’03 model ICP wires. With the ICP wires located, Young pulls back the factory wiring loom to gain access.
Young then spliced into the wires, taped over them, and finished with some wiring loom.
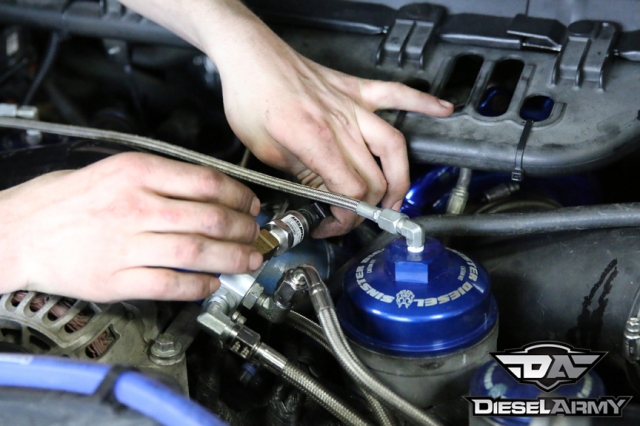
The truck we are installing the gauges on has a Sinister Diesel Regulated Return fuel system on it. So, Young installed a tee on the external regulator. (For a factory system, the fuel pressure would be taped off of the fuel bowl.)
Auto Meter’s fuel pressure gauge comes with a wiring connector on the end for the fuel pressure sensor. With the sensor installed, Young connects the wiring.
Next, Young installs the supplied fitting into the intake elbow for the boost gauge. Then he lays out the routing for the boost tube and cuts it to length with a razor blade. By using a razor blade, the tube doesn’t get crushed, it won’t crack, and the edges are clean.
With the boost tube cut to length, the ferrule and nut are slid over the tube and installed into the intake elbow.
Finally, onto the EGT probe wiring. In order to monitor the exhaust temperature, the EGT a probe needs to be installed into the system. There are two options here: Option 1, install the EGT sensor before the turbo. This will give you the exhaust temperature that the heads are seeing. Option 2, install the probe after the turbo, which will factor in additional heat the turbo is creating. We opted drill and tap the exhaust manifolds for the EGT sensor so that we could get a better understanding what the health of the actual engine is like.
With the exhaust manifold tapped, the sensor is installed so that it is almost all of the way in but not touching the other side. The dissimilar metals that generate the reading for the gauge to measure are located at the end of the sensor. So, if the sensor is touching something, the reading could be faulty. The main thing to be aware of when routing the wiring is to make sure there is no interference with steering, fuel lines, exhaust manifolds, and there is enough give to remove the sensor and allow for the engine to move and torque a little.
“This kit is really high quality. We install a lot of these and the A-Pillars don’t fit very well. We have to really work to get them to fit right. This just laid right in and fit,” said Young. In addition to the pod fitting well, the gauges match the factory gauge almost perfectly. For this install, we opted not to paint the gauge pod because the owner liked the black with his black truck. If you want to match the interior of your truck, Color Bond paint is available in most factory colors.


